I am a crafter, a lover and finder of junk, a pack-rat saver, recycler and many other things but seamstress or jewelry artist are two things I shy away from...
Why?
Well, when it comes to sewing its because of my Home-Ec class in junior high (yes, back then, in the olden days) it wasn't called middle school yet. In order to get a passing grade in Home-Ec class everyone had to complete a final sewing project, mine was a wrap-around skirt! The cotton material was a beautiful cream color with tiny purple flowers all over. I might have done a good job had it not been for a mouse that lived under the sew machine station I was assigned to. Needless to say, because I was terrified to work at that station, I rushed my project, my hems were crooked, my stitches were wonky and it was a pretty pathetic skirt when all was said and done.
Had it not been for the mouse who knows - I might have been a fashion designer...
But I digress - I love jewelry, bracelets mainly, but I have never gotten into making jewelry. My sister, Ann, makes beautiful jewelry. But I got the idea in my head one night that I should make gifts for some very special women in my life to commemorate a very wonderful event that we were all participating in and I decided to give this jewelry making thing a try so, here's what I came up with...
Wooden Monogrammed Pendant Necklaces!

Here's a list of the items you will need to complete this project.
Materials List:
- Round wooden disc (mine came 6 in a pack)
- 2-piece necklace kit (includes black cording and necklace closures)
- Silver clasp
- Pliers (needle-nose would be preferred)
- Paints - 2 colors of your choice (I used Benjamin Moore paint samples - red for base coat and black for top coat)
- Mod Podge
- Paintbrush
- Vinyl initials (ivory)
- Diamond Glaze by Judi Kinz
- Sandpaper (100 grit will work just fine)
- Colored seed beads of your choosing (mine are red)
- Printed bible verse or quote
- Needle
- Newspaper
- Additional beads (if desired)
Step 1: Paint - Primary Base Coat
Cover your area first with newspaper to protect it from messy painting. Paint both sides and edges of your wooden circle with the base color of your choice - remember this will show through the secondary color, let dry.
Step 2: Paint - Top Coat Color
Paint your top coat color on both sides and let dry - I left the sides of my pendant red. If desirable you can paint the sides as well.
Step 3: Distress Pendant
Now with your sand paper rough up the face of each side of the pendant. The more you sand, the more of the base color will show through. Be careful however if you sand too long in one place you will get down to the bare wood (if you like that effect continue - but be careful to not rub all your paint off.) If you distress a side too much you can always start over and repeat steps 1 and 2 again (allow for drying time between each coat of paint) and distress it again. Wipe off any excess dust from sanding on your pendant or on your work surface.
Step 4: Affix Monogram
Take and place your selected vinyl monogram (I made mine on my Silhouette) or sticker squarely in the center of the pendant.
Alternative choice: Put an image on instead of monogram with a coat of Mod Podge on the entire surface of the pendant and on the back of your image. Place image on wooden pendant, smooth the image out removing any wrinkles or excess Mod Podge and let dry.
Step 5: Affix Seed Beads
(Unfortunately I didn't take a photo while doing that... not enough hands.)
Figure out your placement of the seed beads. On each of the pendants I placed them in different places depending upon the shape of the monogram. Play with the bead placement until you are satisfied with it
BEFORE you put your Diamond Glaze down. Remove beads and apply the Diamond Glaze to the area where the beads will go. It has a nice tip that helps place the product exactly where you want it - however this works best when there is a lip around the item "to coral" the product. Since this surface had no lip I had a difficult time with spillage over the side. Wipe excess off if it spills over the edge.
Place seed beads, wipe excess once again and let dry.
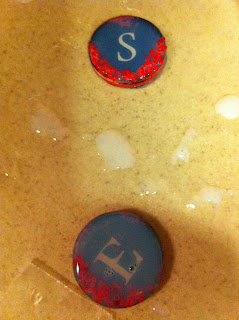
Once dry add Diamond Glaze to the middle of the pendant. It expands and spreads out so go slowly, building up so that the beads are eventually covered. The goal is to have as smooth a top as possible so that the beads are not rough. As you can see in the photo below - bubbles on the "E" pendant have occurred and you can pop them with a needle or "move them" off the surface. The Diamond Glaze will be cloudy when applied but will dry clear.
Caution: If you have Diamond Glaze that drips on the bottom of your pendant - it will stick to the surface that you are working on... you may want to transfer your pendant from the newspaper to another surface or put on pieces of wood to dry so that the pendant isn't glued down to the surface. (I learned that the hard way!)
Step 6: Affix Verse or Quote
While the pendants dried I ran off my verse on the computer. I have Microsoft Word on my computer and used a basic font in italics and adjusted the size of my font to fit the back of my pendant. I copy and pasted the verse on the same piece of paper 5 times for each of the pendants before I printed it off on my inkjet printer. I used plain, white, printer paper but you could use cardstock or colored paper.
I chose Romans 12:6 -
"We have different gifts according to the grace given us." for my verse.
Then I randomly tore the ends of the paper to give it an old scrolled paper look. I placed a layer of Mod Podge on the back of the pendant and on the back of the verse, smoothing out any bubbles or wrinkles. Let that dry.
Once that is dry place another coat of Mod Podge on the entire pendant to seal the paper. Let that dry.
Step 7: Affix Necklace Clasp
Widen the clasp with needle nose pliers to fit the pendant. Keep in mind that you need the clasp to be secure but not so far down that you cover the monogram or image. Once you figure out the placement of the clasp take it off and apply your adhesive to the front and back of your clasp. I used E6000 glue since it is strong and dries clear. Attach the clasp to the pendant and let dry.
The pendant on the left has an added silver ring and 2 black beads and those can be added, if desired, once the clasp has dried.
Step 8: Complete Necklace
I bought a 2-piece necklace kit that had the black plastic cord together with silver spring style closures (I am not sure of the technical term for those). I measured out the length of cord that I wanted either 16" or 18" - I believe those are standard necklace length sizes which are flattering to most people. If you want yours longer, measure your cord accordingly. Thread one end of the cord into the end of the silver closure and crimp the end of the metal spring flat with your needle nose pliers which holds the cord in. Repeat and do the same thing on the other end of the cord. One end had a necklace clasp and the other end has a ring which the clasp attaches to.
Step 9: Admire Your Work
Now give yourself a pat on the back or an imaginary high-five! Do a little victory dance (like me!)
YOU DID IT !!!
If you are like me, it is really nice when a plan comes together. When you think of something and then you put it together and it works...
The ladies I gave these to were very happy with them too and that was the best feeling to give them something homemade and unique.
Here's a view of the back:
And another view of them once completed.
What have you made that you gave to someone else?
Share your comments below. I look forward to hearing from you.
Be Blessed,
Elaine


